Category Archives: Maker Stuff

Cosplay Advice for Nervous Beginners

I used to create elaborate Halloween costumes as a high schooler, but I didn’t learn to properly “cosplay” until I was over 30. That seems weird perhaps, but I think I was born a little too early to properly get into the “cosplay” scene, and it also took me a little time to carve out the time and money to make it happen. I’ve always been an extrovert that didn’t mind standing out from the crowd, and that’s helped me a lot in getting into this hobby. But I know there are people who are more introverted who still would like to try but aren’t sure how.

I’ve been doing cosplay at cons now for around 4 years. At MAGFest I did a Mai Shiranui cosplay that seemed to be pretty well-received! Based on how much I’ve learned over the last few years I’m just going to share some beginner’s tips that I’ve learned from 4 years of screwing up. I hope this will help you on your quest!

Here’s nine pieces of advice… and then, four things I’m still learning and would love advice about!

Continue reading

Making Makoto’s Black Dress

This last weekend I went to the Sailor Moon Silver Millennium Masquerade Ball! It was an event in celebration of the 25th anniversary of Sailor Moon, with formal costumes, drinks, dancing, and moonlight. We enjoyed the event very much. But what does someone wear to something like this? Well…

I wanted to do a “canon” gown from the Sailor Moon manga, show, or art. My favorite character is Makoto, or Sailor Jupiter, and I have cosplayed her before in her regular Sailor Senshi outfit. (You might think that a geek girl who likes computers would be all about Sailor Mercury. I do like her, but Sailor Jupiter is the awkward girl who is a hard kung fu badass on the outside, but a sweet romantic on the inside. Plus she loves to cook! So I love her to bits.) I knew I wanted to do something Jupiter-inspired. After examining my options, I thought about doing the green gown… but, I polled my friends, and we had never seen anyone attempt Makoto’s black gown, which Jupiter wears in the Sailor Moon Super S series. The episode is actually about a date going pretty badly for Makoto, but… I figured for a real date, it would be pretty charming. Plus, I’m kind of into the whole “girl falls for the villain” thing anyway. Sorry, not-sorry.

So I made up my mind to create this dress.

For the last year and change, I’ve been taking sewing lessons at the JoAnn Fabrics in Downingtown. I must give my thanks for this to the incredible Denise, who is the instructor there who helps with the “Sew What” classes. She will allow someone to bring in basically any project and she’ll give guidance on how to make the outfit come to life. She is a big help with teenage cosplayers and helped me make my first from-scratch cosplays, as well as this gown!

Whenever I’m ready to create a new cosplay, the first thing I do is pin a bunch of views to my Pinterest. In this case, screenshots of the dress available on-line, and a very nice rendition done on DeviantArt, were my main clear references for the costume.

Looking at the pictures of the dress in the anime, I thought black velvet would be the most dramatic for the real dress. After looking at the options available at hand, I picked the pattern McCalls M7320, View C, to make this dress.  It has a slightly longer train than the ‘canon’ dress, but I liked the effect of this. Changing the skirt bottom would be simple enough though if you wanted a shorter train on the gown. The dress does have some seams up the front. Sewing these on didn’t interfere much with the design and gave the dress some much-needed structure and fitting help. I made just a couple of small changes: one, I sewed some bra cups into the top of the dress to help out with some support, and, two, I had to create and sew on the little off the shoulder straps on either side. Other than that, the dress itself was pretty much the same as in the pattern!

The biggest challenge of this was the rose applique. To plan it, I took the art of the rose, and shifted it to grayscale, then blew it up in Photoshop. It took some trial and error to get the rose the right size. Once I had the size I liked, I printed it out on multiple pieces of paper which I taped together. I used 2/3 of a yard of red satin, and 2/3 yard of light purple satin. I had quite a bit of purple left over, but I was okay with that since it did give me some chance to make mistakes. You could probably get away with a bit less if you placed leaves carefully before cutting out.

Since getting the size of the rose right was a challenge, I’ll provide my final pattern for if you want to try it yourself. (Link to it in my public OneDrive.) I laid all the pieces out on to the fabric, and cut out interfacing in the same shape as the pieces. I used 805 weight fusible interfacing to back the satin. The first step is to iron the interfacing on the “wrong” side of the fabric, then cut the shape as precisely as you can. Finally, peel the paper back of the interfacing off. The interfacing will add stiffness to the fabric so it won’t lose its shape during the embroidery process. And it’s fusible on both sides as well for placement.

For embroidery, I had three colors of thread: pink for the rose petals, dark purple for the leaves, and a light purple embroidery thread to match the light purple on the leaves, which was used for the stems. Using my printout as a guide, I first lined up the flower shape where I wanted it, and ironed it onto the velvet fabric (carefully, since velvet is easy to wreck with too much heat). After that, I used tailor’s chalk to trace on the patterns of the petals. Then I used my sewing machine on an embroidery stitch, and carefully followed the lines that I drew! This was time consuming, and I didn’t get it exactly perfect, but I was pretty happy with the way it turned out.

From there, I started first with the leaf that overlaps the rose, since its placement was most critical. Again, I ironed it on first, then sewed it on, this time with the dark purple thread. Then I used my template to carefully lay out all the remaining leaves and sew each one in place.

To make the stems, I put a paper backing under the dress, and again traced the lines I needed onto the dress with chalk. I mostly did this freehand, using the template and eyeballing the right placement for the swirl at the bottom, as well as connecting all the leaves and the rose itself. The paper backing peels off when sewing is complete. And the pattern was done!

To make the shoulder straps, we measured around the shoulders, and cut four strips of velvet with a “peak” on each one. I sewed stiff interfacing onto the inside of all four strips to make sure the sleeve pieces had enough body to stand up on their own. They don’t add any structure to the dress and just sort of hang there. But they look nice!

I’d say the one thing I ended up disliking about wearing the dress is that, even with added bra cups, it didn’t really give me much support up top. Upping my corset and bodice construction game is one skill I definitely want to work on this year in crafting. But the next time I make a ballgown, I’ll go for one that I can wear a regular bra under, for comfort reasons. My next dress is probably going to be Princess Peach!

I do have one other regret, which is that I was in the restroom when they did the “every Sailor Jupiter” group photo, and I totally missed out on it. Ugh! But there’s some photos of the ball on my Instagram. I have some professional photos coming of our final look at the ball, but in the mean time, here’s a couple snaps of the finished dress. Good luck if you try to make it yourself or something like it!


Fixing A Frowny Face on the Raspberry Pi

This post is to document a weird error for posterity. But first, some background:

We’ve been working for a while on a device that uses the Raspberry Pi 2 running Windows 10. It’s neat! If you want more information about how to install Windows 10 on a Raspberry Pi 2 or 3, go here:

Windows IoT
Basically, the steps are:

  1. Get Pi
  2. Get an SD Card for the Pi
  3. Download and install Windows 10 on that SD Card
  4. Slip that card into the Pi and boot
  5. Connect your board to a network (I used wired at first, but a wireless gadget can work too)
  6. Deploy code to the board

The first few steps of getting Windows up and running are really straightforward!

But:  I encountered a problem sometimes. Folks told me it’s worth it to write this entry in case other people run into that same problem.

Windows 10 worked great for me when my Pi was plugged into the wall. However, I’m creating a device that I want to be portable, so I’m powering the Pi, and the Pi’s tiny screen, with these portable power supplies that run on AA batteries. They work great! Mostly!

RPi-battery-power-supply

However, the battery drain on the device from running an entire computer and a small monitor was more than I initially imagined. And batteries don’t die evenly. When the battery power is low, but not entirely dead, the Pi might give the impression that it’s working even if it doesn’t actually have enough juice to work. When that happens, it will start dropping off the network, not allow you to push code, and then, finally, it will lose Windows.

When that happens, you might get the dreaded Frowny Face error.

This error is very mysterious. A frowny face definitely tells you something is wrong, but it really doesn’t help you understand what.

I did find the frowny face hilarious though. My Pi is currently in a 3D printed case that has a small window, so the frowny face made it look just like Game Boy from the Captain N cartoon…

th

Sorry, I’m showing my age. I think this is also a character on Adventure Time?

adventureBMO

It’s the same character, people; it’s amazing! Only mine was, as I mentioned, frowning.

Anyway, I discovered that the problem, essentially, was that the Pi had some power, but not enough power. When it didn’t have enough juice, it wasn’t able to boot up Windows 10 after all. All it could do about this was be sad! The problem was fixed when I simply replaced the batteries in my portable power supply. I rebooted Windows, and I was able to push code again. But since it seemed like it was sort of working, I’m ashamed to admit it took me quite a while to figure out that the problem was the power supply, rather than Windows or the SD card. This is especially true because it doesn’t all fail at once. First pushing code stops working, then Windows stops working, as the power gets lower and lower. So if you do get the frowny face, don’t despair! Try getting more power and the Pi will work again.

Happy hacking!

Spouse Alert – a Useful IoT Hack

During this week I participated in a Hackathon to increase my own skills and work with my work team. I decided to do a quick project using the Particle Core!

A lot of times during the day my husband wears headphones and it’s hard to get his attention. I thought it might be fun to create a flashing light device that gets his attention whenever I needed him. I set it up with a few different color functionalities, and used the topper from our wedding cake to set the Particle Button inside. The Button has a ring of muti-colored LEDs that can be activated with the use of a simple API call.

I used a fork of the basic Button code, which is on my GitHub here, and created the “SpouseAlert” script. Using Particle Build, I then flashed the code to my device.  Here’s what the chip looks like with the lights on and flashing (red, in this case)

20150731_124128

Then I wrote a short Web App to activate the different lights. Using the Windows Voice Commands QuickStart I was able to create an app that could be activated either by clicking or by voice. If I say “Particle, Spouse Alert!” it will open up the app page with the appropriate alert selected.

Here’s the app – it’s pretty simple but it gets the job done. And yes, I used a phone to take a picture of a phone…

20150731_124213rot

I can also activate the lights using a call to Yo. Yo is a silly app but it does something simple – sends a “Yo” message to a person or thing. That means it’s pretty fast if you want to send a “Yo” to an object. In this case, I’m activating the call to Yo with If This, Then That. I learned about this trick from David Washington, whose Super Bowl touchdown light project was an inspiration for me to try the Particle Button!

After putting all the code together, I fit the Particle Button underneath my wedding cake topper. Yes, I saved it all this time… all I had to do was carve a couple holes in it for the wiring. Here it is lit up!

20150731_124128green

Now when I activate the app it uses a few different patterns of bright lights to send an alert. I hope it’ll help out with communication for us for a while! I think a device like this would also be useful for people whose spouses are hard of hearing. Different colors and flash patterns could be used to send different quick messages, and you don’t even have to be at home!

Hopefully soon I’ll post a tutorial for interacting with the Particle on Channel 9. Also, I’m teaching an Intro to Particle at Walnut Street Labs’ iSchool in September! You can join me the evening of September 9 and I’ll show how to get started with Particle and make simple experiences like this one!


I Used the MakerBot

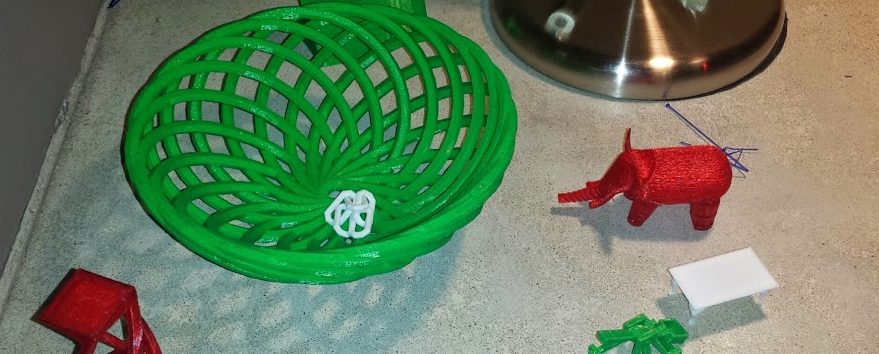
I had always seen 3D printers from afar, as some kind of miracle device that could just effortlessly make stuff. The hype online about 3D printing was incredible. But when I talked to anyone who had used a 3D Printer, they quickly warned me that the devices aren’t really magic. In fact, it actually takes some practice to get a 3D Printer to behave, and nothing turns out great at first.

I think the world should know.

This post exists primarily to catalog my series of failures in 3D Printing. Hopefully you’ll find that educational, and appreciate an honest look, along with my tips.

Continue reading

Light Painting at Dragon Hacks 2015

Two weeks ago I attended DragonHacks at Drexel University. It was my first time going to an all-hardware Hackathon and I had a really fun time seeing what people came up with!

I want to share with everyone a cool Kinect hack that one of the student teams did. Using Kinect and an Intel Edison, Christopher Frederickson, Nick Felker, and Max Bareiss created a tool that will change the color of an LED to line up with a palette projected onto a screen. As the light changes color, the subject is photographed in long exposure, creating a beautiful multicolored light painting! This video demonstrates how it works:

Max was kind enough to link me to the team’s documentation, so you can try this hack at home if you want. Check it out right here: The Light Painter’s Palette

If you want to see another weird (but non computerized) hack from the event, check this funny one out courtesy Major League Hacking: The Portable Shower.

DragonHacks was super fun – I look forward to doing a lot more hacking and making this year!