Category Archives: Tutorials

Making Makoto’s Black Dress

This last weekend I went to the Sailor Moon Silver Millennium Masquerade Ball! It was an event in celebration of the 25th anniversary of Sailor Moon, with formal costumes, drinks, dancing, and moonlight. We enjoyed the event very much. But what does someone wear to something like this? Well…

I wanted to do a “canon” gown from the Sailor Moon manga, show, or art. My favorite character is Makoto, or Sailor Jupiter, and I have cosplayed her before in her regular Sailor Senshi outfit. (You might think that a geek girl who likes computers would be all about Sailor Mercury. I do like her, but Sailor Jupiter is the awkward girl who is a hard kung fu badass on the outside, but a sweet romantic on the inside. Plus she loves to cook! So I love her to bits.) I knew I wanted to do something Jupiter-inspired. After examining my options, I thought about doing the green gown… but, I polled my friends, and we had never seen anyone attempt Makoto’s black gown, which Jupiter wears in the Sailor Moon Super S series. The episode is actually about a date going pretty badly for Makoto, but… I figured for a real date, it would be pretty charming. Plus, I’m kind of into the whole “girl falls for the villain” thing anyway. Sorry, not-sorry.

So I made up my mind to create this dress.

For the last year and change, I’ve been taking sewing lessons at the JoAnn Fabrics in Downingtown. I must give my thanks for this to the incredible Denise, who is the instructor there who helps with the “Sew What” classes. She will allow someone to bring in basically any project and she’ll give guidance on how to make the outfit come to life. She is a big help with teenage cosplayers and helped me make my first from-scratch cosplays, as well as this gown!

Whenever I’m ready to create a new cosplay, the first thing I do is pin a bunch of views to my Pinterest. In this case, screenshots of the dress available on-line, and a very nice rendition done on DeviantArt, were my main clear references for the costume.

Looking at the pictures of the dress in the anime, I thought black velvet would be the most dramatic for the real dress. After looking at the options available at hand, I picked the pattern McCalls M7320, View C, to make this dress.  It has a slightly longer train than the ‘canon’ dress, but I liked the effect of this. Changing the skirt bottom would be simple enough though if you wanted a shorter train on the gown. The dress does have some seams up the front. Sewing these on didn’t interfere much with the design and gave the dress some much-needed structure and fitting help. I made just a couple of small changes: one, I sewed some bra cups into the top of the dress to help out with some support, and, two, I had to create and sew on the little off the shoulder straps on either side. Other than that, the dress itself was pretty much the same as in the pattern!

The biggest challenge of this was the rose applique. To plan it, I took the art of the rose, and shifted it to grayscale, then blew it up in Photoshop. It took some trial and error to get the rose the right size. Once I had the size I liked, I printed it out on multiple pieces of paper which I taped together. I used 2/3 of a yard of red satin, and 2/3 yard of light purple satin. I had quite a bit of purple left over, but I was okay with that since it did give me some chance to make mistakes. You could probably get away with a bit less if you placed leaves carefully before cutting out.

Since getting the size of the rose right was a challenge, I’ll provide my final pattern for if you want to try it yourself. (Link to it in my public OneDrive.) I laid all the pieces out on to the fabric, and cut out interfacing in the same shape as the pieces. I used 805 weight fusible interfacing to back the satin. The first step is to iron the interfacing on the “wrong” side of the fabric, then cut the shape as precisely as you can. Finally, peel the paper back of the interfacing off. The interfacing will add stiffness to the fabric so it won’t lose its shape during the embroidery process. And it’s fusible on both sides as well for placement.

For embroidery, I had three colors of thread: pink for the rose petals, dark purple for the leaves, and a light purple embroidery thread to match the light purple on the leaves, which was used for the stems. Using my printout as a guide, I first lined up the flower shape where I wanted it, and ironed it onto the velvet fabric (carefully, since velvet is easy to wreck with too much heat). After that, I used tailor’s chalk to trace on the patterns of the petals. Then I used my sewing machine on an embroidery stitch, and carefully followed the lines that I drew! This was time consuming, and I didn’t get it exactly perfect, but I was pretty happy with the way it turned out.

From there, I started first with the leaf that overlaps the rose, since its placement was most critical. Again, I ironed it on first, then sewed it on, this time with the dark purple thread. Then I used my template to carefully lay out all the remaining leaves and sew each one in place.

To make the stems, I put a paper backing under the dress, and again traced the lines I needed onto the dress with chalk. I mostly did this freehand, using the template and eyeballing the right placement for the swirl at the bottom, as well as connecting all the leaves and the rose itself. The paper backing peels off when sewing is complete. And the pattern was done!

To make the shoulder straps, we measured around the shoulders, and cut four strips of velvet with a “peak” on each one. I sewed stiff interfacing onto the inside of all four strips to make sure the sleeve pieces had enough body to stand up on their own. They don’t add any structure to the dress and just sort of hang there. But they look nice!

I’d say the one thing I ended up disliking about wearing the dress is that, even with added bra cups, it didn’t really give me much support up top. Upping my corset and bodice construction game is one skill I definitely want to work on this year in crafting. But the next time I make a ballgown, I’ll go for one that I can wear a regular bra under, for comfort reasons. My next dress is probably going to be Princess Peach!

I do have one other regret, which is that I was in the restroom when they did the “every Sailor Jupiter” group photo, and I totally missed out on it. Ugh! But there’s some photos of the ball on my Instagram. I have some professional photos coming of our final look at the ball, but in the mean time, here’s a couple snaps of the finished dress. Good luck if you try to make it yourself or something like it!


How to Simulate a Tiny Universe in Azure

If you need a quick getaway, why not try simulating and exploring your own little personal universe?

Microsoft Azure is open to all kinds of open source code projects, so I thought it might be neat to try running my own OpenSim on an Azure server. OpenSim is a bit like Second Life, but open source. Anyone can create their own shard worlds to manipulate however they wish. It allows for a very private virtual world for use in role play gaming, education, or just to build out your own environment however you like and play with some 3D construction tools.

When you’re done with your OpenSim project, it will look like this:

 B4nLJE_CEAAnhP8

This is a virtual world that anyone can log into, provided they have an IP and login credentials. So this is a simple multiplayer environment that you can add additional game elements to if you want. And it really only takes a few hours to set up, if you know the steps.

Continue reading

Putting Real Map Data in Unity Game Engine – Philly Game Jam

In November I was part of the Philly Game Jam with some talented Philadelphia folks – Tatiana, Andrew, and Laura – at the Cipher Prime studios in Philadelphia! It was a lot of fun and we made a quick game called Evacuate Philadelphia which will be demoed at the next local IGDA meeting. It’s a little rough, but that is the nature of a game jam piece after all.

I want to talk about something that made me pleased about this game. The topic of the jam was “Deconstructing Philly.” I immediately thought it might be fun to use real Philadelphia data from the Open Data Philly project in our game. So I started looking through the data sources for something that might make for an interesting game idea.

Continue reading

Sun Run: HUD Stuff

My game more or less works now. I added an additional enemy type, a “hill” that the player can crash into. I also added a quick HUD that shows a score which increments as the game progresses. None of the things I’m showing right now look nice. The hill is just placeholdered with the “capsule” in Unity and looks pretty weird, like an old Mario World hill in silhouette. The HUD is just black text. And my startup and end screen that I’m about to show are even worse… but the time for makepretties will be later; now I just want to get things working.

The code I wrote just does a “break” when the player dies. This obviously won’t work, so I need to add some additional scenes to my project.

I have two additional scenes: Splash, and GameOver. Splash will be the scene the player sees when the game first loads up. GameOver is after the player dies.

To make sure my game sees these scenes, I have to to go File-> Build Settings, and add each new scene to the build with the Add Current button. I should see a list of three scenes.

sunhudstuff3

Notice I am working in Windows Phone mode right now. So here’s this very ugly loading screen…

sunhudstuff2

Ha ha, I’m sorry, I still don’t even have a proper title for the game. But this is just a single sprite, so later, when I have a very pretty loading screen, all I will do is replace this placeholder with my pretty screen and we’ll be good to go! A small script advances the scene. I add this script to the sprite and set “scene” to be SunScene (the primary scene for the game). Then when the screen is clicked, the scene loads and the game starts. The updated script to kill the player uses Application.LoadLevel to load up the game over screen, and the game over screen also uses a click to return to the home screen.

Stuff to do:  make prettier splash screens, make a prettier score HUD and keep track of the player’s score, maybe with leaderboards? Playtest and work on feel and hitboxes, then add some Windows Phone features and publish. When HUD and score tracking are complete I’ll upload a couple web builds. Maybe you can test for me?

Sun Run: Physics

This part of the Sun Run project is the part that has taken me like, forever. Hopefully in this post I will be able to condense what took a lot of trial and error for me into some quick useful help for you.

What I would like in this game is the feeling that the player drives the horses, but needs to protect the chariot. Basically, ropy physics to make the avatar feel snake-like, so the control over the chariot is slightly indirect. Here’s the little most primitive diagram of what I’m talking about:

sunrunhorsesclose-dia

I started out with keyboard controls, but then added some mouse controls as well, so the player can use either tapping the top and bottom of the screen to move the chariot up and down, or use the arrow keys on the keyboard to move it up and down. I decided to try uploading the codes (it’s just the code for now, not the assets) to my very quiet GitHub, so if you want to follow along you can check them out there. I’ll update the commit periodically. Here’s the current version of the runner script. I’ll end up updating the code later to be sure it has proper touch control listening too. But what’s key here is that I put the code module on the front horse, and not on the chariot itself.

To make a chain in Unity you can use Unity’s 2D physics Hinge Joint. Each horse has a RigidBody2D and a HingeJoint2D, and they’re connected in a line, then parented to each other to allow the chariot to drag behind each horse. These are the settings currently on, which will probably be tweaked later (but this is already a result of a lot of tweaking…)

rigidbodyshot

RunHorse1 (the front horse) is connected to RunHorse2, and so on, all the way to the chariot itself in the back. With four horses connected this way to a final chariot sprite, the control feels pretty tight, with just a little bit of slack behind. The -.75 on the chain anchor means that the horse connects to the horse behind it with a little slack instead of directly. The setting between the last horse and the chariot is at -1. I experimented with angle limits, but I didn’t like the result, so they are off for now. Notice there’s no gravity on my front horse and very little mass. If I use gravity, the horse will just fall, so away it goes! The light mass also means it’s very easy to control. Each horse has the smallest possible mass and the chariot itself is set to 0.003. Right now I’m keeping everything very light so the control feels tight, but if I want to make things harder to control, increasing the chariot’s mass makes it drag the whole chain down and is one way of doing it.

I’ve done a little playtesting with these controls and they feel “okay,” but maybe a little easier than I’d like for things to be. Some early feedback I got was that the primitive chariot sprite has a pretty unclear hit box. I’m actually using a particle system to make the chariot burst into flames… it’s so pretty, but I fear it hurts the clarity of the game, so it may have to go. Also, I’ll need a better chariot sprite and to make sure the enemy hit boxes are clear as well. Work for next time…

Sun Run: Adding Some Runner Mechanics

I hope everyone had a good weekend! It was a holiday here, which is why I slowed down development (to work on a different project actually, but also see The Edge of Tomorrow and play Shovel Knight, both recommended) but now I’m back!

Let me talk about how I went from having some sprites to having a bit of a game…

First of all, I want to give credit to the resources that have helped me with this project. One resource that has helped me out a lot is Jesse Freeman’s Unity training, and his book, which gave me some useful code for creating enemy spawns in the game. I won’t replicate that code here, but with some info in his book, I was able to create three different spawn points to spawn enemies on the board, which will fly toward the player. The first enemy sprite is a bird drawn with basically the same method as the horse sprite. You can see the graphical representation of these spawns in this working shot here, on the right:

unity-showingspawns

After a lot of trial and error, I decided not to have the player actually move from the spot. I looked at some endless runner code that actually moved the player, but it seemed to make more sense to actually keep the player stationary and give the illusion of movement instead. Enemies spawning from offscreen to the right was one way to do it, but what about the background? I saw my co-worker Dave Voyles had a great solution for that in his schmup games:

unity-showingiso

If I zoom out of my scene and switch to 3D Isometric view, you can see what’s really going on. There’s a cylinder in the background that shows a texture that’s set to perfectly wrap. The sprites are in the foreground. The code to make the cylinder rotate on its own is really simple…

public class BGRotate : MonoBehaviour {

public float BGRotSpeed = 10f;

void FixedUpdate()
{
// rotate this
transform.Rotate (Vector3.up, BGRotSpeed * Time.deltaTime);
}
}

The transform.Rotate tells it what direction and speed to rotate. I can change the speed of the motion in Unity later, though what I’ll probably do is write a bit more script to speeds things up slowly over time (which would also have to affect the enemy spawns).

The black bars at the top, bottom, and back of the scene are destroyers. They’re used to kill the player if they crash into the ground, and destroy any birds that happen to get past the player, cleaning up the scene. This may not be the most efficient solution for cleanup, but it’s working for me for now. The code for how to get the destroyers set up is in Unity’s Live Training archive under “Let’s Make a Game: Infinite Runner.” I’m linking the whole archive because it’s some of the most useful free resources for learning specific Unity tasks that I can find. It starts out gentle for beginners and has lots of specific code examples for different problems you might encounter!

Next blog I’ll talk about the chariot motion using 2d physics, which was/still is the biggest trial and error point in the game. Want to get that feel just right…

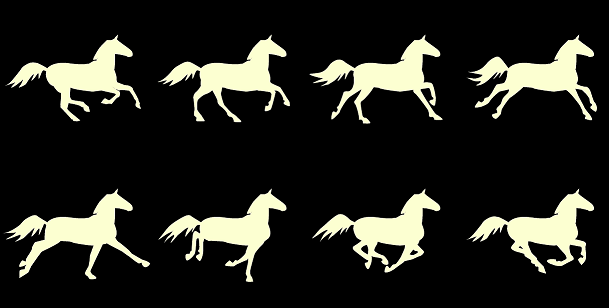
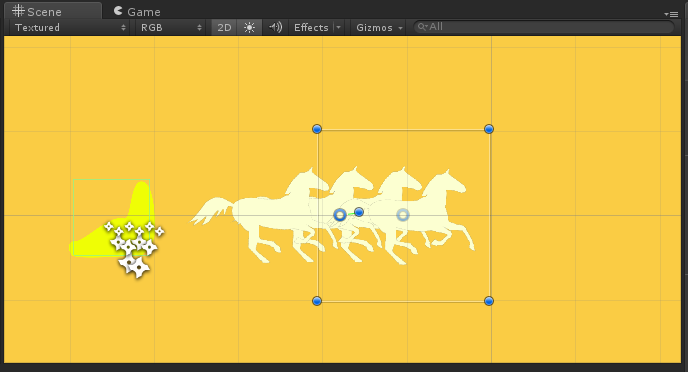
Sun Run: Sprite Strategy

For most of these dev blogs, I’ll assume some basic Unity familiarity, like someone who has attended one of my Unity Getting Started talks. But I’ll explain some specific stuff about my progress. If it’s a little too basic, or if I go too fast, let me know by giving me feedback in comments or on Twitter. (Don’t be alarmed if your comment doesn’t appear right away; I moderate.)

Making a game requires design, playtesting, and lots of stuff people are confident they’d be ok at doing. But making a game also requires three things that are intimidating in various degrees: Art, Code, and Sound.

Sound is my weakest link, so I always have to Phone a Friend where it comes to that, and I’m sure this game will be no exception. But for now I’ll talk about Art and Code…

The Unity Asset Store is a good way to get both of those things, if you want to go looking. There’s lots of useful developer tools, plugins, and art there.  I just downloaded Unity-chan for kicks. But… I don’t actually like to use too many pre-built assets in my games because I like to have more control over the art and I don’t like my games to look too stock. So, custom art all the way.

My Unity project is actually set to 3D. You can organize your project folders however you want, but after some trial and error on this project, I find it easier just to group like things in like folders like this:

unityprojectfolder

Sorry it’s small – click to embiggen. Other people like to group things by what they are, so I might put everything to do with the horse in one folder and everything to do with the bird in another. Shown here is my sprites folder. Normally when your Unity project is set to 2D, any texture you import will automatically become a sprite. But my project is actually still set to 3D, so all I have to do when I import something if I want it to be a sprite is change it to a sprite in the inspector:

unitytexturetosprite

Robot Unicorn Attack is probably my favorite endless runner. Of course the importance of the catchy theme song and the design can’t be overlooked, but I think one reason it works so well is the graphics. There’s something about a running horse that’s super graceful. It totally delights 12-year-old-me, still living in my brain clutching her Lisa Frank Trapper Keeper. Fortunately, a childhood full of drawing racing ponies in the margins of my notebook during study hall left me well-prepared to sketch out this sprite:

horserunning8frame-reference2

The background of this is actually transparent – I just dumped black in there to make it more visible on the blog. I also shrunk it down some for the post but you get the idea. Now that I look at it like this, the bottom-left frame is still feeling awkward to me, so I’ll probably fix it, and there’s a liiiittle bit of a ‘shake’ where something isn’t lined up right. But after importing a sprite into Unity, if you change it in the folder in the project, it will update in the game, so I’m not really stuck with it.

This sprite looks really intimidating to draw. Actually it’s pretty easy, though, and if you’re just getting started with frame to frame animations, it’s hard to go wrong with the run cycle on a horse. That’s because a) a horse run is pretty uniform, so you don’t have to worry too much about giving it individual character like you would with a human run cycle, and b) there’s so much useful reference available of this cycle. I really like the famous Muybridge photo series, which you can easily find with a web search, but any web search for “running horse reference” gets pretty good result pictures.

eadweard-muybridge-horse

My sprites aren’t identical to this sequence but sketching it out is pretty easy. I used the pen tool in Photoshop, and simply copied the key frames of a horse run, tweaking them slightly and trying to get the horse shape to match previous frames. I used different reference photos for the tail, which I then adjusted to move up and down with the body. It’s not a hundred percent realistic, but since my horse is flying, I never moved the body at all.  I just drew the head and body on a separate layer and only redrew the legs and tail in every frame. That way the size of the body is consistent and it’s easy for a player’s eye to track. I also choose Photoshop because it’s where I’m most comfortable, but if you like free tools there’s InkScape (which is like Illustrator) or GIMP.

Drawing with the pen tool means I can set my sprite to be any size, but I’m using 1024 sprites for now and I’ll play with the resolution later. (If in doubt I find it best to start with a really high rez and then optimize down, unless I’m going for a pixel art look.) So my sprites are actually pretty huge. I also have to set the sprite tool to Multiple with a sheet like this, and then click on the Sprite Editor button to slice it up into individual sprites.

unitytexturetosprite-2

Here’s what all those sprites look like after using the Sprite Editor to break them down:

unitytexturetosprite-3

They have numbers on them, since they’re set up as frames, so if I select all the sprites (not just one) and drag them into the stage, Unity will create a new animation. I wanted to make an animated gif of it, but it would take longer to do that than it does to make the animation in Unity, so I’ll post some videos later of the whole thing in action. That’s all for now. Good luck if you want to draw cute horses!